Let's revisit the record head alignment procedure with a little bit of video. Feel free to go back to the reel-to-reel record head alignment post to refresh your memory on this fascinating subject. On the AKAI GX-280D, we have three screws to adjust the recording head. Head alignment is taken care by the three screws working together (mostly the two screws right above and below the head). Azimuth is adjusted with the side screw.
Assuming you have created a CD with a 1 kHz tone and popped it into your CD player, we are gonna record the tone (on the reel-to-reel) and feed the played signal (via the headphone jack) to our favorite audio editing software (cool edit pro, to cite one). It's relatively easy to adjust for height since you want to get the loudest possible recording (as you see it played in the audio editing software). You just have to keep an eye on the dB levels and adjust the two screws for maximum levels.
Now, what we are really interested in is the azimuth alignment. For that, you have to look at the phase analysis after you are done with a recording (say, 10 seconds) and adjust the side screw until you get a recording for which the Lissajous curve is close to a diagonal.
The video just shows azimuth alignment and how the Lissajous curve should look like for a 1 kHz tone. You are supposed to rinse and repeat for the 10 kHz tone but it's a little bit harder to do.
On the AKAI GX-280D, the recording head has three adjustment screws, meaning both the height and the azimuth can be adjusted. The azimuth is how much the angle between the head gap and the tape varies from 90 degrees. You want zero azimuth angle, that is the head gap and the tape should be perpendicular to each other. You typically play with all three screws for height adjustment and just the one screw that's off to the side for azimuth. In the following, we are going to focus on the azimuth adjustment.
When the azimuth is not zero, the left and right channels are out of phase and the best way to visualize out of phase left and right channels is to do a phase analysis and display the so-called Lissajous curve. When the curve is reduced to a diagonal that looks like a forward slash (/), the two channels are in phase and that's what you are aiming for. The audio editing software cool edit pro enables you to view Lissajous curves (phase analysis), which means we will have no problem aligning the recording head for azimuth. If your audio editing software does not have this phase analysis capability, you may have a hard time properly adjusting the azimuth just by ear (although it's quite possible to do so).
What you want to do is record a tone with the recording head, play the recorded signal and feed it (via the headphone jack or the audio line-out) to the audio editing software for phase analysis. All this is done at the same time since anything you record on the reel-to-reel deck can be played by the play head as the tape passes from the record head to the play head, assuming you don't forget to switch from source to tape.
It seems that all we need now is a tone to record on the reel-to-reel tape deck. Well, that's quite easy to obtain from the audio editing software: generate a stereo tone at a given frequency and save it as a wav file. For azimuth alignment purposes, you need a tone at 1 kHz and one at 10 kHz. Burn those two tracks on a CD and you are good to go.
So, the procedure is as follows: pop the CD with the two tones in the CD player (connected to the audio line-in of the reel-to-reel), play the 1 kHz tone, record using a fresh tape and forward the signal coming from the play head to the audio editing software. Turn the azimuth adjusting screw (a little at a time) until you are satisfied with the shape of the Lissajous curve. Then it's time to switch to the 10 kHz tone and repeat the procedure for fine tuning (might be harder this time because of the much higher frequency).
Aligning the play head on a reel-to-reel deck is pretty easy if there is only one adjustment screw, like on the AKAI GX-280D. The play head adjustment screw controls how far in or out the play head sits in relation to the deck face, in other words, the height. The official AKAI way to check for head height is to make sure that the upper edge of the upper core of the head is at the same height as the upper edge of the tape. Another way which I find a bit more logical and satisfying is to play a prerecorded tape (as is, not a homemade one, especially by your deck) and look for maximum output as you turn the adjusting screw (a little bit at a time).
Assuming you have a tape that's known to have been recorded on a properly aligned machine (an old school prerecorded tape), a little computer with an audio card and some editing software, it should be pretty easy to figure out the relative output level of anything that passes through your deck's play head. Most audio editing software will give you some way to determine the decibel (output) level of anything you record. In cool edit pro, you can get statistics for anything you record and in particular, an histogram showing for any decibel level (x axis), the percentage of time the recording plays at that output level. The more shifted to the right (higher decibel level) the histogram is, the louder the recording is. The free audio editing software audacity can do pretty much the same thing, if you don't have cool edit pro. It'd be easier if you could get your hands on a single tone alignment tape but those are hard to come by and are pretty expensive. Indeed, in that case, you would just look for maximum output level looking at the VU-meter on the tape deck or the audio editing software. Because a pre-recorded music tape has a bunch of tones, you have to look at the frequency histogram and see how much it shifts to the right to have an idea of the output level.
The bottom line is to be able to tell which, among two recordings of the exact same passage on the prerecorded tape, has greater output. If you record something on the tape with the screw "as is" and record the exact same thing with the screw turned a quarter turn, say, clockwise and it turns out the output is not greater, then the next step is to return the screw to the original position and turn it a quarter turn, this time, counter-clockwise. If, on the other hand, the output level ends up being greater, then the next step is to turn the screw another quarter turn clockwise. If you keep comparing recording output levels for different screw positions, pretty soon you will find the screw position that gives maximum output (or close to it).
Now, the problem with using a prerecorded tape is that the left and right channels may not have the same output level. So, when you look for maximum output, you have to consider one channel and stick with it. Once you are satisfied with one channel, you should double check that the output level for the other channel is maxing out as well. It should be pretty close. Aligning the head would be much easier with a calibration tape that has the same output level on the left and right channels since you could just maximize the mono output (the sum of the left and right channels) or alternatively, minimize the difference between the two channel output levels.
The AKAI GX-280D has a single play head, which means that when the the tape reverses direction, the play head gets shifted (automatically). Of course, there is a screw to adjust the amount of shifting. One can can adjust the reverse play height the exact same way as we did for the forward play height. My very own AKAI GX-280D does not work in reverse (it used to but never at the same level as forward) so can't really talk about it that much. In any case, reverse playing is in my opinion NEVER as good as forward playing, so why bother anyway?
Alignment of the recording head is more involved since you have three screws to contend with. Together, they control head height and azimuth (how parallel the head is to the tape). We will delve into record head alignment, and in particular azimuth alignement in later posts.
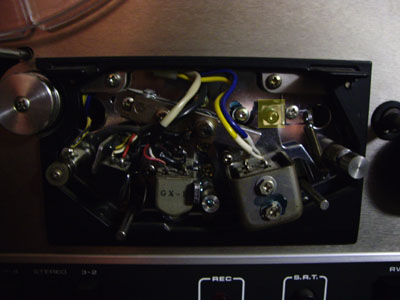
This is my beloved AKAI GX-280D with the head cover removed. Don't be fooled by the 280 moniker because it predates other AKAI GX models with lower model numbers, like the 265. As you can see, there are just three heads and the play head does double duty as it shifts to play in reverse (yes, the 280 can play in reverse).
From left to right: erase head, recording head and play head. The play head adjustment screw is shown in the yellowed box.
This video shows you how to align the play head using a prerecorded tape, a pc and some audio editing software (cool edit pro).